Tag Archives: icing

Frosty Vanilla Cupcakes

ncFrostyCupCk1nm

Who doesn’t love cupcakes? Especially if they’re frosted with rich, swirly buttercream…now that’s pretty hard to resist! If you’ve heard of the famous Magnolia Bakery in New York City, well, this is the recipe for their most popular cupcake. They call it the Vanilla Vanilla–a yummy vanilla cupcake with vanilla buttercream (pink is their most popular-selling frosting color). I found the recipe at FoodNetwork.com. If you’re a cupcake-lover you will want to try this! Or, according to the Food Network site, if you’d rather make a cake, you can divide the batter between two 9″ round cake pans and bake for 30 to 40 minutes. Even though I haven’t tried making the cake version, I would recommend checking the cake at 30 minutes, because when I made the cupcakes, they were done at the lower baking time. They would have been too dry had I let them bake any longer.

These cupcakes look really festive, wintry, and Christmasy with the white buttercream and pearly sprinkles I used. You could also tint the frosting green or red if you wanted it to be more colorful for Christmas. The white frosting would work great for New Year’s Eve or Day, too. These cupcakes would also be fun with silver or gold sprinkles. I also thought the white frosting with white pearl sprinkles would be nice for a wedding shower or wedding…so you see, these delicious cupcakes are really versatile!

There is a chance you might need to make extra frosting, depending on how heavily you frost these cupcakes…just wanted to point that out. I frosted some heavy and some not-so-heavy because not everyone likes lots of frosting on their cupcakes (being a frosting-lover, I do find that hard to believe 🙂 ). So, I had enough frosting for my cupcakes. But had I frosted all of them heavily, I think I would have needed to make more frosting.

Enough talk about the cupcakes…here’s the recipe!

MAGNOLIA’S VANILLA CUPCAKE  very slightly adapted from FoodNetwork.com

Makes 24 cupcakes

CUPCAKES

  • 1 1/2 cups self-rising flour
  • 1 1/4 cups all-purpose flour
  • 1 cup (2 sticks) unsalted butter, softened
  • 2 cups sugar
  • 4 large eggs, at room temperature
  • 1 cup milk
  • 1 1/2 teaspoons vanilla

Preheat oven to 350 degrees. Line two 12-cup muffin tins with cupcake liners.

In small bowl, combine the flours. Set aside.

In large bowl, on the medium speed of an electric mixer, cream the butter until smooth. Add the sugar gradually and beat until fluffy, about 3 minutes. Add eggs, one at a time, beating well after each addition. Add the dry ingredients in 3 parts, alternating with the milk and vanilla. With each addition, beat until the ingredients are incorporated but do not over-beat. Using a rubber spatula, scrape down the batter in the bowl to make sure the ingredients are well blended. Carefully spoon the batter into cupcake liners, filling them about 3/4 full. Bake for 20 to 25 minutes, or until a cake tester inserted into the center of the cupcake comes out clean (Note: mine were done at 20 minutes, so be sure to check your cupcakes then to avoid over-baking!).

Cool the cupcakes in tins for 15 minutes. Remove from the tins and cool completely on a wire rack before icing.

VANILLA BUTTERCREAM

(A note from the bakery: “The vanilla buttercream we use at the bakery is technically not a buttercream but actually an old-fashioned confectioners’ sugar and butter frosting. Be sure to beat the icing for the amount of time called for in the recipe to achieve the desired creamy texture.”)

  • 1 cup (2 sticks) unsalted butter, softened
  • 6 to 8 cups confectioners’ sugar (I used 8 cups because I wanted a thicker frosting)
  • 1/2 cup milk (I substituted half and half for the milk)
  • 2 teaspoons vanilla extract

Place the butter in a large mixing bowl. Add 4 cups of the sugar and then the milk (or half and half) and vanilla. On the medium speed of an electric mixer, beat until smooth and creamy, about 3 to 5 minutes. Gradually add the remaining sugar, 1 cup at a time, beating well after each addition (about 2 minutes), until the icing is thick enough to be of good spreading consistency. You may not need to add all of the sugar. If desired, add a few drops of food coloring and mix thoroughly (use and store the icing at room temperature because icing will set if chilled). Icing can be stored in an airtight container for up to 3 days. NOTE: if you like to frost your cupcakes with lots of frosting, you may want to double the frosting recipe so you have enough!

ncFrostyCupck2nm

The recipe makes 2 dozen cupcakes or one 9″ layer cake. Enjoy trying this out!

Linked to Sweets for a Saturday, Sweet Indulgences Sunday, Foodie Friday.

Advertisement

Eat Your Peas and Carrots!

My foodie friend Jane made some really cute cupcakes a few weeks ago. She made Peas and Carrots Cupcakes and Popcorn Cupcakes–I’ll show you the Popcorn Cupcakes in a little bit.

nclrPeasNCarrotsCupsnm

The “peas” are green Skittles® and the “carrots” are orange Starburst® candies–just cut an orange square candy piece into fourths to get four cubes that look a lot like carrot chunks! Frost your cupcakes with white or green tinted icing, then add the candies on top, pressing them into the frosting.

Jane also showed me a photo of some other fun cupcakes decorated like food…I’ve seen photos of cupcakes like these on the web, and they’re called TV Dinner Cupcakes. This photo is from a lifestyle and design blog called BlackEiffel.

foodcups

Here are instructions for the TV dinner cupcakes from MarthaStewart.com…the instructions are also in the cookbook Hello, Cupcake! by Karen Tack.

TV DINNER CUPCAKES  (makes a total of 6 cupcakes)

You’ll need 6 vanilla cupcakes, baked in silver foil liners.

FOR DRUMSTICKS (makes 3):

  • 1/4 cup white chocolate melting wafers, melted
  • 1 cup Vanilla Frosting (homemade or canned)
  • 3 plain store-bought doughnut holes
  • 1 cup cornflake crumbs
Place the bone template (from the book Hello, Cupcake) on a baking sheet (or draw your own shape of half a bone–you’ll have to estimate the size). Cover with parchment paper; set aside. Place melted chocolate into a resealable plastic bag and snip a 1/8-inch corner from the bag. Following the bone template, pipe an outline onto the parchment paper. Fill the bone in with chocolate and lightly tap pan to smooth top of chocolate. Repeat process 3 times. Refrigerate until firm, about 5 minutes.
Spread vanilla frosting on top of 3 cupcakes, mounding it slightly. Place 1 doughnut hole on top of each cupcake. Spread frosting over the doughnut hole until it is smooth and covered. Place cornflake crumbs in a medium bowl. Gently press frosted cupcakes in crumbs to cover completely. Place cupcakes in a 6-cup disposable aluminum cupcake baking tray. Using a sharp knife, make a small slit in the top of each crumbed doughnut hole. Carefully peel 1 chocolate bone from the parchment paper and insert the pointed end into one of the slits. Repeat with remaining 2 bones and cupcakes.
FOR MASHED POTATOES (makes 1):
  • 1 yellow fruit chew, such as Laffy Taffys® or Starbursts®, cut into a 1-inch square
  • 3 tablespoons Vanilla Frosting (homemade or canned)
  • 1/2 tablespoon store-bought caramel sauce, heated
Spread vanilla frosting on 1 cupcake, mounding it slightly. Use a small spoon to create a well in the center of the frosting. Place cupcake in aluminum baking tray. Place yellow fruit chew in the well at an angle. Drizzle caramel sauce on top of cupcake so that it fills the well and spills over like gravy.
FOR PEAS AND CARROTS (makes 1):
  • 3 orange fruit chews, such as Starbursts®, cut into 1/4-inch cubes
  • 2 tablespoons Vanilla Frosting (homemade or canned)
  • Green gel food coloring
  • 2 tablespoons green candies, like Skittles® or M&M’s®
Color vanilla frosting with green food coloring and spread on top of 1 cupcake. Arrange orange fruit chews and green candies on top of cupcake, pressing them into the frosting. Place cupcake in aluminum baking tray.
FOR CHOCOLATE PUDDING (makes 1):

Place chocolate frosting in a resealable plastic bag; press out all the excess air and seal to enclose. Snip a 1/4-inch corner from the bag. Pipe chocolate frosting into a spiral swirl onto the remaining cupcake. Top with sprinkles and place in aluminum baking tray. Serve.

Now here are the Popcorn Cupcakes Jane made–aren’t they cute? She followed instructions on how to make them at eHow.
ncPopcornCupnm

Here are the steps…Jane said they were easy to make! All you need are cupcakes, frosting, and miniature marshmallows.

POPCORN CUPCAKES

  1. Bake a regular batch of cupcakes, using a cupcake pan lined with paper or aluminum cupcake liners. Although white or light-colored cupcakes are easier to cover with icing, the cupcakes can be any flavor you like. Allow the cupcakes to cool (Jane used a cake mix to make her cupcakes).
  2. Frost the cupcakes with white frosting. Use homemade frosting, or simplify the process with boxed or canned frosting (Jane used canned frosting on her cupcakes).
  3. Cut an ‘X’ shape into the top of each miniature marshmallow, using a clean pair of scissors. Leave the bottom of the marshmallow intact. Cut enough miniature marshmallows to cover the top of each cupcake (about 30 to 40 miniature marshmallows).
  4. Press the miniature marshmallows into the frosting on the top of the cupcakes. Pile the marshmallows so the cupcake looks like a bag filled with popcorn.
  5. Place a small amount of water in a cup. Add a few drops of yellow food coloring to create a buttery color. Use a pastry brush or a clean paintbrush to coat the miniature marshmallows with the butter-colored water.
  6. Create bands from red construction paper, or use red and white striped gift wrapping paper. The bands should be large enough to wrap around the base of the cupcake — about 8 inches by 1 and 1/4 inches. Alternatively, create a band on your computer, then duplicate it several times. Note: Jane used a pre-made band she found at Scribd.com
  7. Wrap a paper band around the base of each cupcake, securing each band with a piece of clear tape.

Hope you have fun trying these out!

Linked to Foodie Friday, I’m Lovin’ It Friday, Sweet Tooth Friday, Sweets for a Saturday, Make it Yours Day, Show and Tell, Strut Your Stuff.

The Best (Texas) Chocolate Sheet Cake

Texas Sheet Cake2 @ NancyC

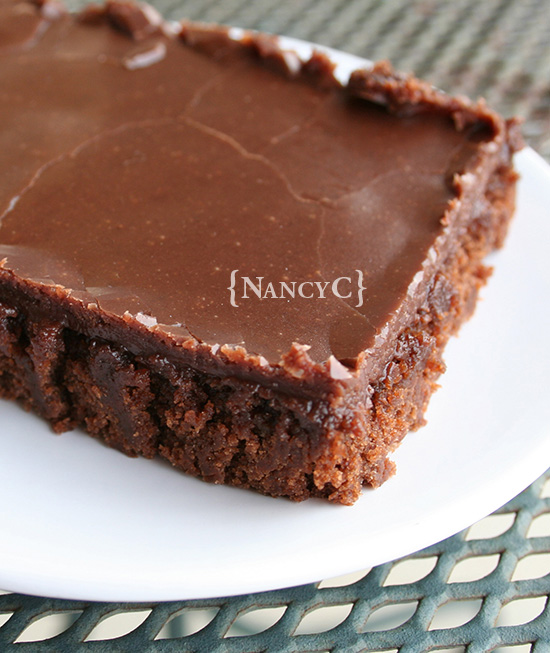
A few posts ago, I told you about a recipe for Cheesy Hash Brown Potatoes, made by Jane Ann for her department lunch. Well, Jane, who is also in that same department, madethis fabulous Texas sheet cake for the dessert. It was super-good…nice and moist, very chocolatey, and topped with a smooth layer of chocolate icing. Jane found the recipe over at The Pioneer Woman, where it’s called The Best Chocolate Sheet Cake. Ever.

Some people call this cake a Texas Sheet Cake because it’s so big…it’s baked in a big 13 x 18″ sheet pan or jelly roll pan, which measures about 10 x 15″. It’s described on The Pioneer Woman website as “…moist beyond imagination, chocolatey and rich like no tomorrow, and 100% of the time, causes moans and groans from anyone who takes a bite.” And as someone who tasted the cake Jane made, I can verify that this is all true! 🙂

Continue reading